
Overview: Project Navigator
|
|
Overview: Project Navigator |
|
Use the Project Navigator to view the contents of Projects TTKs. It displays the contents of projects in a hierarchical list that can be configured in a number of different views. It also provides a quick access toolbar to Alchemy Experts, such as Leverage and Validate.
The project that is displayed in the Project Navigator is referred to as the active project. Folders are used to group items together. In the example below, all online helps files are stored in a folder called Online Help Files.
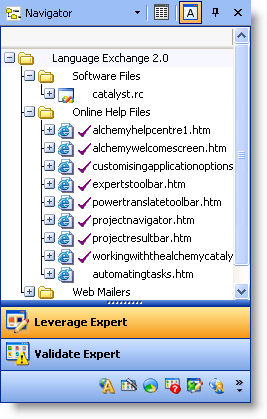
Folders are used to organize the contents of your projects.
To create a project Your project is where you manage and organize all the files that are to be localised. folder, click on the  button. This is located in the project toolbar.
To delete a folder and its contents, click on the  button.
To move a file or folder to a new location, click on it using the mouse and drag and drop it to its new location.
A single item or a group of items can be selected using a combination of the mouse and the [SHIFT] and [CTRL] keys.
To select a single item click it using the mouse. It will be automatically highlighted in the Navigator pane and the Project Workspace pane will display the content of the item.
To select non-contiguous multiple items, hold the [CTRL] key and click items in the Project Navigator pane.
To select contiguous multiple items, hold the [SHIFT] key and click items in the Project Navigator pane.
|
|
You can use a combination of [CTRL] and [SHIFT] to select a group of contiguous and non-contiguous items. |
To change the active project, click on the title of a project in the Workspace pane.

The active project tab will always be highlighted in the Project Workspace pane and its content will be displayed in the Project Navigator pane.
To launch an Alchemy Expert:
Select the items that are to be processed by the expert in the Project Navigator.
Click on the expert button at the bottom of the Project Navigator pane.
 Inserting and deleting files from your project
To insert a file into your project:
Click on the project root The Project Title is referred to as the Root of a Project TTK File. All files and folders are inserted relative to the Root of your Project TTK File. or folder in your project
Click the second mouse button and selectInsert Files... or Insert Filers and Folders...
Locate the file on your desktop and pressOK to insert it into your project
To delete a file/folder from your project:
Click on the file/folder in the Project Navigator
Click the button to delete the file/folder from your project
|
© Copyright Alchemy Software Development 2007 |
|
|

