|
|
Project Division |
|
|
Project Division |
Use Project Division to split projects into a number of smaller projects. Dividing a project into sub-projects using this feature facilitates a number of team members to work independently on different sections at the same time.
Accessed from the File menu, the Project Division command offers the user two methods of splitting projects as well as the option to merge previously divided projects.
|
|
Auto Project Division |
|
|
Choose this option when you want to divide the master project into sub-projects based on the word count. The expert will divide into smaller projects of approximately the same word count. The user can chose to divide into a specified number of sub-projects, or into an unspecified number of sub-projects with a fixed word count.
This option works on the currently open project or on a job file and creates the required output per project file.
More...
|
|
|
Manual Project Division |
|
|
Select this option to see a tree structure of the current project's contents and to manually choose which resources go into a sub-project. This option works on the currently open project and creates a single sub-project at a time.
More...
|
|
|
Merge Project |
|
|
This option re-assembles previously divided sub-projects, importing the contents back into the master project.
More... |
|
|
Large projects can be effectively divided between team members using Project Division. The manual method allows resources to be selected one-by-one and moved to another project, while the automated mechanism creates sub-projects of equal word-counts. |
Manual Project Division
The manual method of project division copies selected resources to the sub-project, resulting in sub-project containing only those exported resource objects. Resources are selected from a navigator meaning complete resources such as dialogue boxes, menus and html pages are copied to the sub-project. Resources are exported as complete blocks, so no segment will exist outside the context of that resource object. However, it also means that segments in large resource objects cannot be sub-divided.
Hidden Segments
The automated division mechanism works differently. It does not result in smaller sub-projects. Instead, all segments are copied to each sub-project but only some are made available for localization. A different batch of segments is available in each project such that all segments from the master project are included in exactly one sub-project. Segments that are included for localization in a sub-project are editable in the normal way, the remaining segments are present, but marked 'hidden' and are not visible in the string list by default. Similarly, they are excluded from all operations such as word counts, pseudo translation, leverage, search, etc.
The reason all segments are included is to make sure full context is available to those who are working on the sub-projects. It is important that full context be available during translation or review phase. For this reason project division does not remove segments from their surroundings - instead, the segments that are to be localized in any one sub-project are left as they are, while those that are to be excluded are marked as hidden.
The Hidden status can not be manually edited. Project Division sets this value when segments are being excluded from a sub-project and removes the status when projects are merged back into the master project.
By default, hidden segments are not shown in the string list, however, they can be made visible using No Filter.
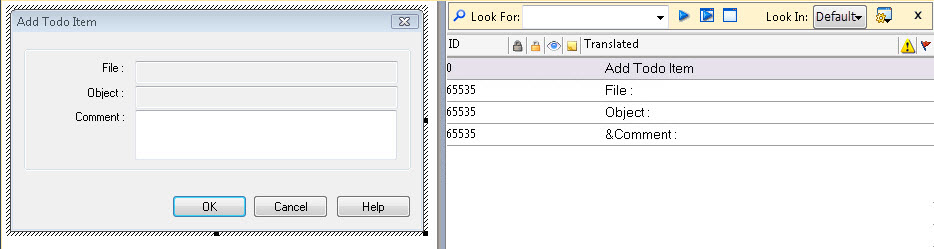
Default Filter
The following screenshot displays a dialog box and the segments that are available for editing. The dialog box displays 7 segments to be localized, however, only 4 are available in the Default filter. These 4 segments are available in this sub-project while the remaining three controls went to a different sub-project.
While only the 4 available segments are listed, the Visual View always shows full context. Hidden controls are displayed for context purposes but are not editable.
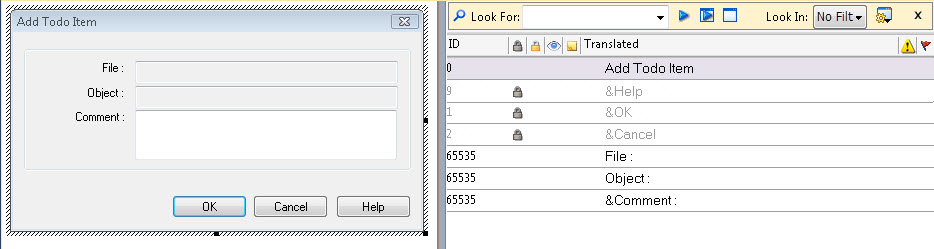
No Filter
To see all segments as they appear in the master project, No Filter may be selected from the Look In: dropdown. In this case all segments are visible, but some are marked as 'hidden'. They are grey and have a special hidden symbol to indicate that they cannot be edited in this sub-project.
| (c) Copyright Alchemy Software Development Ltd. |